Getting Started
 Your API Clients
 OpenAPI Spec
 Change Log
 Terms of Service
Authentication
Most requests made to the API must be authenticated. The API supports 2 schemes for authentication: OAuth and Basic Authentication.
We strongly recommend that you use OAuth. Use basic authentication if you are the only user of your application or if you are an organization account.
Oauth authentication
Ride with GPS is an OAuth provider, and we recommend that you use OAuth if you plan authenticate users others than yourself. The workflow is secure, and does not require users to share their Ride with GPS password with you.
Configuration
From the developer settings page of your account, create or update an API client and specify one or more Redirect URIs (redirect_uri) pointing to endpoints you own. Your API client will then be setup for OAuth and its management page will display your OAuth client ID (client_id) and secret (client_secret). Never share those with anyone.
Authorization flow
1. Authorize
Your application links your user to the authorization web page hosted on the Ride with GPS website:
<a href="https://ridewithgps.com/oauth/authorize
  ?client_id=[client_id]
  &redirect_uri=[redirect_uri]
  &response_type=code">
  Login on Ride with GPS
</a>
Where:
redirect_urimust match one of the OAuth redirect URIs configured for your API Clientclient_idis the OAuth client ID for your API Client
The user will be presented with the following interface:
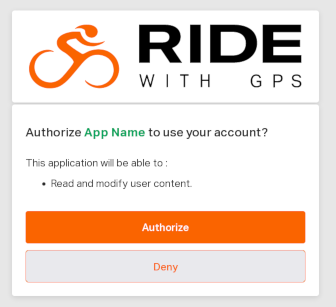
Once the user clicks the Authorize button, they are redirected to redirect_uri with an access grant:
[redirect_uri]?code=[access_grant]
2. Exchange the access_grant for an access_token
Using the access grant that was sent to your redirect_uri, your application fetches the access_token:
Request
- Method:
POST - URL:
https://ridewithgps.com/oauth/token.json
Request body
{
  "grant_type": "authorization_code",
  "code": "[access_grant]",
  "client_id": "[client_id]",
  "client_secret": "[client_secret]",
  "redirect_uri": "[redirect_uri]"
}
redirect_uriin request body must match the one used in the first step above.
Example Response
{
  "access_token": "Qnpa6Bif4gF9s6uU5YwjtxbaP3UzQxgfArDP7HXZj_5",
  "token_type": "Bearer",
  "scope": "user",
  "created_at": 1725551509,
  "user_id": 1
}
user_idis the Ride with GPS assigned id for the user who completed the autorization flow.access_tokenis the token to use OAuth for authentication:
// header
Authorization: Bearer [access_token]
3. Make OAuth authenticated requests
Your application can then make requests on the Ride with GPS API with the Authorization header to authenticate as your user. For example to get more details about the user who just completed the OAuth flow:
GET https://ridewithgps.com/api/v1/users/current.json
// header
Authorization: Bearer [access_token]
4. Revoke OAuth Access Tokens
Issue the following request to revoke an existing OAuth access token:
Request
- Method:
POST - URL:
https://ridewithgps.com/oauth/revoke.json
Request body
{
  "client_id": "[client_id]",
  "client_secret": "[client_secret]",
  "token": "[access_token]"
}
Example Response
// 200 - OK
{}
The token will then be revoked and cannot be used to authenticate requests anymore
Basic authentication
Basic authentication suits the needs of organization accounts and single user applications.
1. Get an authentication token for your account
User accounts
Knowing your email and password, get an authentication token associated with your API key.
Request
- Method:
POST - URL:
https://ridewithgps.com/api/v1/auth_tokens.json - Authentication: Not required
- Header:
x-rwgps-api-key: [api_key]
Request body
{
  user: {
    email: "[your_email]",
    password: "[your_password]"
  }
}
Example Response
// 201 - Created
{
  "auth_token": {
    "auth_token": "c0cc78875f250604f9abac97712e314c",
    "api_key": "2704a8df",
    "created_at": "2024-09-05T05:47:53Z",
    "updated_at": "2024-09-05T05:47:53Z",
    "user": {
      "id": 1,
      "email": "bob@example.com",
      "name": "Bob",
      "created_at": "2024-01-17T01:45:09Z",
      "updated_at": "2024-09-04T17:18:52Z"
    }
  }
}
Organization accounts
Unlike user accounts, organization accounts are not setup with an email and password, which prevents them from using the endpoint above to generate authentication tokens.
Instead, to create authentication tokens, administrators of the organisation can:
- Sign into the organization
- Go to the API clients management page
- Create a new API client if needed
- Edit API client page and click the "Create new Auth Token" button
The page will then display the authentication token and it can be used authenticate the API requests.
2. Make Basic authenticated requests
You can then authenticate with Basic authentication, using your api_key and auth_token:
// header
Authorization: Basic base64encode("[api_key]:[auth_token]")
Alternatively, you can also authenticate with the following headers:
// headers
x-rwgps-api-key: [api_key]
x-rwgps-auth-token: [auth_token]